This article is about a Puerto Rican woman who found out that she was at risk for some health issues like heart disease. She notes that it is not part of her culture to eat certain types of healthy foods. This is an issue that hits close to home for me, and many other I know.
As an African-American, and a member of a 5-person working class family, I grew up eating what I will call "not the best" foods. We ate a lot of pre-packaged foods, a lot of pork, a lot of cheaper cuts of meat, canned vegetables, and indulged in our favorites like mac and cheese what I would say is too often. Not to say that I grew up on Pop Tarts alone; my mother was a stickler for presenting a square meal to us at dinner-- protein, starch and vegetables every night. But those things weren't always fresh or homemade, only to the extent that time and income allowed.
I venture to say that this is not unlike many Americans. Culturally, minorities tend to lean towards these types of foods for a bevy of reasons including access, income, tastes and time. And also because these types of foods that are bad for you tend to also be very good, in their own kind of artificially flavored, high fructose corn syrupy, sodium packed sort of way.
Today, many of us know much more about how to choose healthier foods but there is still that pull towards what our parents and families have done for years that is hard to let go of. I can't lie....I gets DOWN at Thanksgiving! Mac and cheese, turkey with gravy, stuffing, the works. But the rest of the time I try to limit my beef consumption, skip meat at least once a week, eat only lean meats, and eat plenty of fresh fruits and veggies with a huge side of water. In my opinion, choosing a healthy life doesn't mean letting go of some of the cultural food traditions that are not so good. It just means limiting those indulgences; plus, when you have them they taste soooo much better!
Showing posts with label What I'm Eating. Show all posts
Showing posts with label What I'm Eating. Show all posts
Wednesday, March 2, 2011
Monday, January 17, 2011
Quickie Quiche: Tomato, Spinach and Cheddar

Do you ever feel like every meal is running together? The same ingredients rearranged? I know I do. One night I decided to mix it up a little, and have some Quickie Quiche for dinner. I know, Quickie Quiche is a really clever name....yet, I feel confident I am not the first to use it. Oh, well! On to the quiche.
The great thing about quiche is that you can make it so many different ways, and eat it at any time of day. Bacon and spinash. Asparagus and cheese. Mushroom and tomato. You get the picture, eggs go great with everything. You can make it heartier or lighter depending on what you add to the magical mix, not to mention it is a great way to pack a bunch of veggies into one meal. Using store bought crush makes it a super-quickie quiche, but make your own if you prefer. I always make a pretty big one, it goes fast!
 Tomato,Spinach and Cheese Quiche
1 pie crust
6 eggs
1/2 cup milk
kosher salt and pepper to taste
1 tomato, sliced thin
1/2 cup thawed (frozen) or wilted(fresh) spinach leaves
1 cup shredded sharp cheddar
Preheat the oven to 425 degrees. Bake the crust alone for about 7 minutes, or until the surface is set and no longer moist to the touch. Lower the oven to 375 degrees.
Beat the eggs and all the ingredients besides the sliced tomato. Pour the mixture into the crust, and arrange the tomatoes on top.
Bake at 375 degrees for 20-30 minutes or until the top is golden brown and puffed.
Tuesday, January 4, 2011
Sweet and Sour Chicken
Okay, so I have to start out by saying that I had no parts in coming up with this recipe. I only succeeded in making it deliciously without many of the items on what I consider to be a sprawling ingredient list, and in a mere portion of the time. It turned out to be a winner with lean protein, tons of veggies and a sweet but not overly sugary sauce that everyone pretty much loves.*Brushes sugar from shoulder* Now that I'm done bragging about my culinary prowess and chameleon like adaptability in the kitchen, let's move on to the method and ingredient list.
First of all, this recipe is actually for Sweet and Sour Pork (butt) which was changed to chicken. I nixed some of the fresh items like ginger, shortened the marinate time for the chicken and eliminated the deep frying in favor of a saute in a shallow pan of oil. I also omitted the celery because it just seemed wrong to me. Celery? In Sweet and Sour Chicken?
I ended up making substitutions for about half of the ingredients, and it was a smash hit with everyone around the dinner table. To save money, I pulled two breasts from one whole chicken cut up. As always I stashed the neck and back in the freezer for stock making, and made the other six pieces into Oven Fried Chicken for another night. One chicken, two meals, happiness all around! I will post the recipe with my changes since I think that the ingredients I used are more likely to be found in YOUR fridge/pantry today since you will be making this at your next meal immediately following a thorough reading, commentary and sharing of this post via all of the social networks you are a part of. You will. Trust me!
Sweet and Sour Chicken
2/3 cup soy sauce
2 teaspoons minced garlic
1/2 ground ginger
1/2 cup flour, separated in half
2 chicken breasts, cut into cubes
Kosher salt and pepper
1 tb. oil , plus more for saute (canola, olive, whatever you like)
1 cup ketchup
1/4 cup sugar
1/4 cup red wine vinegar
1 ounce honey
1 tablespoon vegetable oil
1/3 cup large diced onion
1/3 cup carrots sliced 1/4-inch thick, on a bias
1/3 cup large diced red bell pepper
1/3 cup large diced green bell pepper
1/2 can pineapple chunks
First of all, this recipe is actually for Sweet and Sour Pork (butt) which was changed to chicken. I nixed some of the fresh items like ginger, shortened the marinate time for the chicken and eliminated the deep frying in favor of a saute in a shallow pan of oil. I also omitted the celery because it just seemed wrong to me. Celery? In Sweet and Sour Chicken?
I ended up making substitutions for about half of the ingredients, and it was a smash hit with everyone around the dinner table. To save money, I pulled two breasts from one whole chicken cut up. As always I stashed the neck and back in the freezer for stock making, and made the other six pieces into Oven Fried Chicken for another night. One chicken, two meals, happiness all around! I will post the recipe with my changes since I think that the ingredients I used are more likely to be found in YOUR fridge/pantry today since you will be making this at your next meal immediately following a thorough reading, commentary and sharing of this post via all of the social networks you are a part of. You will. Trust me!
2/3 cup soy sauce
2 teaspoons minced garlic
1/2 ground ginger
1/2 cup flour, separated in half
2 chicken breasts, cut into cubes
Kosher salt and pepper
1 tb. oil , plus more for saute (canola, olive, whatever you like)
1 cup ketchup
1/4 cup sugar
1/4 cup red wine vinegar
1 ounce honey
1 tablespoon vegetable oil
1/3 cup large diced onion
1/3 cup carrots sliced 1/4-inch thick, on a bias
1/3 cup large diced red bell pepper
1/3 cup large diced green bell pepper
1/2 can pineapple chunks
1. In a large non-reactive bowl, combine soy, garlic, ginger, and half the flour Season the pork generously with salt and pepper. Place the chicken in the bowl and toss to cover. Marinate in the refrigerator for 1 hr.
2. Drain off any excess marinade and dredge the chicken in the remaining flour seasoned with salt and pepper. In a large frying pan heat enough oil to cover the pan to 350 degrees F. Fry the chicken in batches until golden brown, flipping each piece half way through. Drain on paper towels. Reserve on a warm plate.
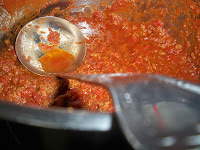
3.In a separate bowl, combine the ketchup, sugar, vinegar, and honey. Whisk to blend.
4. In a small roasting pan heat the tablespoon of oil. Place the vegetables into the pan, allow them to soften for about 2 minutes then add the chicken pieces and cover with the ketchup mixture. Bring to a simmer and cook until the chicken is cooked through.
2. Drain off any excess marinade and dredge the chicken in the remaining flour seasoned with salt and pepper. In a large frying pan heat enough oil to cover the pan to 350 degrees F. Fry the chicken in batches until golden brown, flipping each piece half way through. Drain on paper towels. Reserve on a warm plate.
3.In a separate bowl, combine the ketchup, sugar, vinegar, and honey. Whisk to blend.
4. In a small roasting pan heat the tablespoon of oil. Place the vegetables into the pan, allow them to soften for about 2 minutes then add the chicken pieces and cover with the ketchup mixture. Bring to a simmer and cook until the chicken is cooked through.
Friday, November 5, 2010
Pizza and Pondering on a Friday Night


Sometimes I ask myself why I blog. I am not no more of an extraordinary home cook than many bloggers online. I don't necessarily always cook the most elaborate meals, or the most exotic. And I certainly don't often have access to the finest ingredients money has to buy. But I do know what I CAN do. I can stretch 2 chickens into four meals for four people. I can create entire meals under $5. I can mix organic and natural foods in my family's diet on a budget. I can make delicious food that doesn't require any level of cooking skill, intricate tools or a lot of time. And I can certainly love the feeling I get when I go into the kitchen and make something so good that I feel like someone else needs to know about it! So I will continue to try my best to bring you recipes, information and tips that get me through my day to day trials in the kitchen, and beyond.........Whew! With all that said, let's talk about pizza.

I don't know many people who have a whole lot of luck at making really good homemade pizza dough. I love pizza but there's nothing I hate more than shelling out $30 for a pizza night and getting some suck-a$$ pizza! It's always 50/50 with these pizza places, sometimes a hit and sometimes a major, major miss. Actually for me it's more like an 80/20 miss-hit ratio. So after some research online, I found a great dough recipe and made pizza without even getting out a pot for the sauce! Not to mention the obvious health benefits of making your own food as opposed to eating out, and saving MAJOR dough (<-----pun intended).
 |
| Happy Helper/Eater #1 |
 |
| Happy Eater #2 |
The best thing about this dough recipe is that it is so simple, and can be ready to bake in an hour if you wait until the last minute on a weeknight. Or you could fancy it up with toppings for a girls' night or game day with the guys. If you make it ahead, this is literally at 15 minute, $5 dinner kind of night. It also works well regardless if you like thick or thin crust. Some variations I made on this recipe:
- I also substituted instant yeast for active dry yeast. If you have instant yeast, you don't even have to start the yeast in warm water, just add it in with the dry ingredients before adding to the wet.
- I also par-baked the crust for about 7 minutes before adding the toppings to prevent sogginess.
- For the sauce, I opened a can of crushed tomatoes and spooned it onto the crust, then sprinkled lightly with garlic powder, a pinch of salt, and a sprinkle of Italian seasoning. Add movie and enjoy!
Prep Time: 5 min + 1 hr proof time Cook time: 15 minutes
Cost: $6.23 for two pizzas Servings: 2 large pizzas

- 2 1/4 teaspoons active dry yeast (I substituted instant)
- 1/2 teaspoon brown sugar
- 1 1/2 cups warm water (110 degrees F/45 degrees C)
- 1 teaspoon salt
- 2 tablespoons olive oil
- 3 1/3 cups all-purpose flour
- In a large bowl, dissolve the yeast and brown sugar in the water, and let sit for 10 minutes.(Skip if using instant yeast)
- Stir the salt and oil into the yeast (or water/sugar) solution. Mix in 2 1/2 cups of the flour, adding instant yeast to flour if you're subbing for active dry.
- Turn dough out onto a clean, well floured surface, and knead in more flour until the dough is no longer sticky. Place the dough into a well oiled bowl, and cover with a cloth. Let the dough rise until double; this should take about 1 hour. Punch down the dough, and form a tight ball. Allow the dough to relax for a minute before rolling out. Use for your favorite pizza recipe.
- Preheat oven to 500 degrees F (220 degrees C). If you are baking the dough on a pizza stone, you may place your toppings on the dough, and bake immediately. If you are baking your pizza in a pan, lightly oil the pan, and let the dough rise for 15 or 20 minutes before topping and baking it.
- Bake pizza in preheated oven, until the cheese and crust are golden brown, about 15 to 20 minutes.
Tuesday, October 19, 2010
4 Ways to Avoid Kitchen Waste Altogether
Today I was roving the Internet for useful information to share, and came across this article on "Seven tasty ways to stop wasting food". Living with Rhymes with Rasheed is the ULTIMATE lesson in not wasting food - you should see the emotional look he gets on his face when I just have to throw out an old tomato I find squished in the back of the fridge. But I understand where he's coming from. Anyone who can afford to forget about a tomato in their cooled storing device is lucky compared to the over 1 billion malnutritioned people in the world who do without basics everyday. It is said that Prophet Muhammad (saw) could not go to bed if his neighbors were hungry, and in essence mitigating food waste is part of the modern day equivalent to ensuring that our neighbors aren't going to bed without. While their list focuses on what to do with leftovers, mine is based on preventing the leftovers from even ending up in a sketch looking plastic bowl in the fridge :)

1. BREAD - Of course there is French toast, bread pudding, croutons, bread crumbs and crisps that can be made from bread that is nearly stale. But to prevent getting to the point where I have a pantry full of crumbs and croutons, I freeze loaves of bread. It keeps bread fresh, and defrosts rather quickly and if you need a slice super fast you can toast it for about 30 seconds and you have fresh bread ready to go. I buy name brand (like Arnold and Nature's Own) at my local Dollar Tree. It is a dollar a loaf compared to $2.50+ at the grocery, and is usually about 2 days from expiration. This way you can use your bread on what you want to, not what you have to!
 2. PROPERLY STORE FRUITS AND VEGETABLES- Do not wash vegetables before storing them, the added surface moisture will make them rot faster, and be sure to remove them from those little plastic produce bags, which can hold in gases released by fruits and veggies and speed up rot. Check this vegetable storage guide for specifics on veggie storage.Save peels, stems, pieces, etc. for stock by keeping a large zip-top bag in the door of your freezer where you can easily stash them as they come along. Add soft veggies to dishes where they don't usually belong like sauces, chili, sloppy joes, or any other dish where they will go unnoticed by picky husbands, children, and friends.

3. ORGANIZE YOUR FRIDGE- Once a week go through the fridge and put all of the items that are on their way out in the front. This way they aren't forgotten and are easily accessible when dinner comes around. Also, keep a list on the front of the fridge door with available dairy and produce items that have a short shelf life so you remember them.

4. HAVE A LEFTOVER PARTY- If you can't avoid excess leftovers, share your random leftovers with friends! Dress up leftover spaghetti as baked spaghetti, or make leftover mashed potatoes into potato cakes and host a pot luck so they can bring their weirdo leftovers too. That's a meal you don't have to really prep for, and you don't let all your week's tasty bits and pieces go to waste.
1. BREAD - Of course there is French toast, bread pudding, croutons, bread crumbs and crisps that can be made from bread that is nearly stale. But to prevent getting to the point where I have a pantry full of crumbs and croutons, I freeze loaves of bread. It keeps bread fresh, and defrosts rather quickly and if you need a slice super fast you can toast it for about 30 seconds and you have fresh bread ready to go. I buy name brand (like Arnold and Nature's Own) at my local Dollar Tree. It is a dollar a loaf compared to $2.50+ at the grocery, and is usually about 2 days from expiration. This way you can use your bread on what you want to, not what you have to!
3. ORGANIZE YOUR FRIDGE- Once a week go through the fridge and put all of the items that are on their way out in the front. This way they aren't forgotten and are easily accessible when dinner comes around. Also, keep a list on the front of the fridge door with available dairy and produce items that have a short shelf life so you remember them.
4. HAVE A LEFTOVER PARTY- If you can't avoid excess leftovers, share your random leftovers with friends! Dress up leftover spaghetti as baked spaghetti, or make leftover mashed potatoes into potato cakes and host a pot luck so they can bring their weirdo leftovers too. That's a meal you don't have to really prep for, and you don't let all your week's tasty bits and pieces go to waste.
Friday, October 15, 2010
Make Your Own...Sausage!


Sausage is one of those things that I try to stay away from in the store. It's packed with sodium, additives for freshness and color, and sometimes fillers. This is a quicky way of making sausage; if you own a meat grinder do it the old-fashioned way by all means but I don't. So this is a shortcut, five minute way of making sausage for the rest of us. If I'm making a breakfast sandwich I made them thin an big enough to cover my bread of choice. I used 1/2 lb 93/7 ground turkey and 1/2 lb 96/4 ground beef, but you can use whatever you have on hand. And a sidenote: only use the rolls of ground meat at the store. The snakey looking stuff doesn't have the right texture and it WILL crumble and fall apart on you. Trust me :/ Also, if you use really lean meat like I did, you might want to add a tiiiny bit of oil to the pan, to help with browning.
Sausage Seasoning
Prep Time: 3 minutes Cook time: 3-4 minutes
Cost $2.18 Servings: 4-6
1 lb. ground turkey, ground beef or a combination 1 ts. ground sage
1 1/4 ts. salt
1/2 ts. garlic powder
pinch of onion powder
1/2 ts. crushed red pepper
1. Place meat in a bowl, add all spices and mix thoroughly. Cover with plastic wrap and use within 2 days.
Monday, October 11, 2010
Beef Vegetable Stew with Black Pepper and Cheese Croutons
Tweet


When the weather is getting cool, there's nothing quite like a big bowl of something warm and good, and this beef vegetable stew really hit the spot. But then when you add in the black pepper and cheese croutons, things really start to get good. Really, super comforting.
My husband isn't a very big fan of light fare like soups and salads when dinner time rolls around. I'm trying to slowly change his mind and offer lighter alternatives, but he loved this traditional stew with the twist of the black pepper and cheese croutons. When you think about it, Americans are one of the few cultures that I know of that eat their biggest meal of the day in the evening. The Spanish are infamous for their leisurely lunches known as la comida,the largest meal of their day, in the late afternoon and then enjoy a siesta, their afternoon nap which can last up to two hours (wouldn't that be nice!). With all of that said, I am trying to keep as many meals as light as possible. You can make this with any combination of your favorite vegetables, or leave out the meat altogether. This stew and cheesy crouton was just the right combination: light, but filling and oh so good!
1/2 of a zucchini, chopped and cubed


When the weather is getting cool, there's nothing quite like a big bowl of something warm and good, and this beef vegetable stew really hit the spot. But then when you add in the black pepper and cheese croutons, things really start to get good. Really, super comforting.
My husband isn't a very big fan of light fare like soups and salads when dinner time rolls around. I'm trying to slowly change his mind and offer lighter alternatives, but he loved this traditional stew with the twist of the black pepper and cheese croutons. When you think about it, Americans are one of the few cultures that I know of that eat their biggest meal of the day in the evening. The Spanish are infamous for their leisurely lunches known as la comida,the largest meal of their day, in the late afternoon and then enjoy a siesta, their afternoon nap which can last up to two hours (wouldn't that be nice!). With all of that said, I am trying to keep as many meals as light as possible. You can make this with any combination of your favorite vegetables, or leave out the meat altogether. This stew and cheesy crouton was just the right combination: light, but filling and oh so good!
Beef Vegetable Stew


Prep time: 15 minutes Cook time: 30 minutes
Cost $6.57 Servings: 6+
1/2 of a zucchini, chopped and cubed
3/4 c. corn kernels
1/2 an onion, finely chopped
1/2 cup carrots, cubed, shredded or grated
3 medium potatoes, peeled and cubed
1/2 pound stew meat or beef, in 1/2 inch cubes
2 tablespoons olive oil
kosher salt and black pepper
1 teaspoon garlic powder, or 2 cloves of garlic
1/2 teaspoon onion powder
1- 28 oz. can crushed tomatoes
1- 28 oz. can petite diced tomatoes
2 tablespoons tomato paste
1. Heat the olive oil over medium heat in a large pot until it glistens and ripples.
caramelized onions
2. Brown the meat, adding it to the pan so that there is space between each piece. If necessary, cook the meat in batches but be sure not to overcrowd the pan. Remove from pan.
3. Add the onion and fresh garlic if you're using it, and soften the onions then add the meat back to the pot.
4.Add the crushed and diced tomatoes, the tomato paste, garlic and onion powder and season with salt and pepper. Let the mixture heat through, then add the potatoes.

5. Wait 5 minutes, and add the zucchini, corn and carrots.
6.Leave the soup as is, or mix two tablespoons of flour with 1 tablespoon of butter or butter substitute in a small dish until combined and add it to the soup to thicken the texture. Cover and on medium-low heat for 25 minutes.

Black Pepper and Cheese Croutons
1/2 loaf of thin sliced Italian bread3 tablespoons grated Parmesan cheesecroutons with olive oil1/4 cup Mozzarella or Italian blend cheesecracked black pepperolive oil for drizzling
1.Preheat the oven to 425 degrees.

2.Spread the bread out on a sheet pan, and drizzle with olive oil.
3.Bake the bread for 8-10 minutes, or until the bread is browned and crisp on top.
4.Add the mozzarella or Italian cheese, then the Parmesan cheese, and top with a sprinkle of black pepper.
5.Return to the oven for another 5-7 minutes or until the cheese is melted, bubbly and brown. Eat. Enjoy.
Sunday, October 10, 2010
Easy Oven Fries
Tweet

1/4 cup water
olive oil
kosher salt
Preheat the oven to 450 degrees.
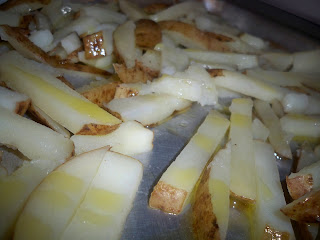
Rinse and cut the potatoes into 1/2 inch pieces.
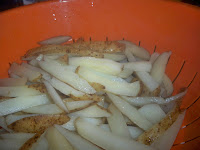
Place the pieces in a microwave safe bowl with 1/4 cup of water and cover with plastic wrap, cook on high for 8 minutes or until the potatoes are fork tender but not completely cooked through.
Drain the potatoes and toss with olive oil to coat.
Transfer to a baking sheet and bake for 25-30 minutes or until the fries are crispy. Use a spatula to toss the fries halfway through.Garnish with kosher salt while hot.


Today I faced the same dilemma many of us face on many nights: eat out or eat in. After a busy week, a night out at a restaurant can be a good break and saves some cooking and cleaning up time so there's more time for fun. But then there's the EXTREMELY inflated price of restaurant food, and the fact that unless you're going to a unique or upscale restaurant, you're getting an added-fat, added-sodium, added-preservative version of things you usually cook at home. Not to mention that for those of us with little ones it means a trip, which in turn means rounding up bottles, diapers, wipes, bibs, baby this, baby that. It's good for every now and then but it can be more trouble than it's worth. I started out sending Shaheid to the store for a pizza, and ended up whipping up these darn tasty baked fries with a burger for our Saturday night fare. The burger is just a 96/4 patty with 2% sharp cheddar cheese slice, grilled onions, pickles, lettuce and tomato on a whole wheat roll. But the fries....the fries are the real star here. Sure, they're not as crispy as deep fried potatoes, but what could be more flavorful than crispy potatoes with Extra Virgin Olive Oil and a pinch of salt that's just enough so that the flavors pop in your mouth? All I know is that when I was eating these fries, I didn't care to know.
I used the microwave to prep the potatoes and then finish them in the oven, which makes the whole thing about 20-30 minutes from start to finish. If you're really in a rush, you can broil them instead of baking them but you better watch out for the broiler monster, who distracts you from watching your foods until you smell the distinct smoky smell of BURNT. They're cheapier than fast food or frozen fries, plus they taste better and you can make them in about the same amount of time as you'd make some of their flash-fried, evil step-cousins. Potatoes are cheap, and salt and olive oil are staples, so it's practically free :) These fries + DVR'd Grey's Anatomy = Mommy time! You'll come back to these time and time again. Just try not to make it the same day :)
UPDATE: I tested these fries again, and found that a hot pan makes for a bit of extra crispy-ness so you can put your baking sheet in the oven while it is preheating for added crunch. And unless you're in a super time crunch, don't skip the baking because it removes moisture from the potato which also adds to the crisp. Also, the "fries" won't be super brown but I promise you they will be crispy!
UPDATE: I tested these fries again, and found that a hot pan makes for a bit of extra crispy-ness so you can put your baking sheet in the oven while it is preheating for added crunch. And unless you're in a super time crunch, don't skip the baking because it removes moisture from the potato which also adds to the crisp. Also, the "fries" won't be super brown but I promise you they will be crispy!
Easy Oven Fries
Prep time: 7 minutes Cook time: 40 minutes
Cost $1.87 Servings: 4
3 pounds potatoesPrep time: 7 minutes Cook time: 40 minutes
Cost $1.87 Servings: 4

1/4 cup water
olive oil
kosher salt
Preheat the oven to 450 degrees.
Rinse and cut the potatoes into 1/2 inch pieces.
Place the pieces in a microwave safe bowl with 1/4 cup of water and cover with plastic wrap, cook on high for 8 minutes or until the potatoes are fork tender but not completely cooked through.
Drain the potatoes and toss with olive oil to coat.
Transfer to a baking sheet and bake for 25-30 minutes or until the fries are crispy. Use a spatula to toss the fries halfway through.Garnish with kosher salt while hot.


"Hidden Veggie" Chili and Perfect Skillet Cornbread
Tweet

Fall is absolutely my favorite season. Sometimes it's still warm during the day, you can wear a jacket or not, and you can have a great day outdoors and have something warm and tasty in a bowl for dinner. So because it was fall, and for no other particular reason, I made an old-fashioned chili and cornbread dinner.
When I told Shaheid (a.k.a. "Rhymes with Rasheed") that I was making chili I got one of those "Oh no..." looks. He then proceeds to tell me that he thought that HE was the chili maker in our house, because it's not one of my strong suits. After I finished rolling my eyes and quickly reminded him about the time he microwaved two ribeyes in an effort to defrost them, I started my chili. I decided to add some "hidden veggies" to the recipe because there is no such thing as too many vegetables especially when your two year old and your husband (or whatever picky eater is in your life) don't even know they're there! I used 96/4 ground beef and didn't miss the great flavor of it's fattier friends with all of the great spices in this dish.
I made a few changes to a skillet cornbread recipe from The Pioneer Woman, adding some sugar to the recipe and subbing in fat-free and low fat dairy. The edges were crispy and the inside was soft and a tiiiny bit sweet, just what I'm looking for in a great skillet cornbread. If you don't have cast iron pan, try using a cake pan or other baking pan and heating it in the oven as it preheats. That should get you as close as you can get to the same crispy crust achieved in cast iron. P.S. I wish I had a piece right NOW!

In a large pot over medium heat, brown the ground beef and drain any excess liquid.
Add the onion and allow them to soften for 3 to 4 minutes.
Add the zucchini and carrot and cook for an additional two minutes.
Next add the crushed and diced tomatoes with all their juices.
Heat the mixture through, add the spices and cook over medium-low heat for 20 to 30 minutes.

Combine cornmeal, flour, salt, and baking powder in a bowl. Stir together.
Measure the buttermilk and milk in a measuring cup and add the egg. Stir together with a fork. Add the baking soda and stir.
Pour the milk mixture into the dry ingredients. Stir with a fork until combined.
In a small bowl, melt 1/4 shortening. Slowly add melted shortening to the batter, stirring until just combined. In an iron skillet, melt the remaining 2 tablespoons shortening over medium heat. Pour the batter into the hot skillet. Spread to even out the surface. (Batter should sizzle.)
Cook on stovetop for 1 minute, then bake for 20 to 25 minutes or until golden brown.
Edges should be crispy!


Fall is absolutely my favorite season. Sometimes it's still warm during the day, you can wear a jacket or not, and you can have a great day outdoors and have something warm and tasty in a bowl for dinner. So because it was fall, and for no other particular reason, I made an old-fashioned chili and cornbread dinner.
When I told Shaheid (a.k.a. "Rhymes with Rasheed") that I was making chili I got one of those "Oh no..." looks. He then proceeds to tell me that he thought that HE was the chili maker in our house, because it's not one of my strong suits. After I finished rolling my eyes and quickly reminded him about the time he microwaved two ribeyes in an effort to defrost them, I started my chili. I decided to add some "hidden veggies" to the recipe because there is no such thing as too many vegetables especially when your two year old and your husband (or whatever picky eater is in your life) don't even know they're there! I used 96/4 ground beef and didn't miss the great flavor of it's fattier friends with all of the great spices in this dish.
I made a few changes to a skillet cornbread recipe from The Pioneer Woman, adding some sugar to the recipe and subbing in fat-free and low fat dairy. The edges were crispy and the inside was soft and a tiiiny bit sweet, just what I'm looking for in a great skillet cornbread. If you don't have cast iron pan, try using a cake pan or other baking pan and heating it in the oven as it preheats. That should get you as close as you can get to the same crispy crust achieved in cast iron. P.S. I wish I had a piece right NOW!
Hidden Veggie Chili

- 1 lb. lean ground beef
- 1/4 cup shredded zucchini
- 1/4 cup shredded carrot
- 1/2 an onion, diced
- 3 tb. ground chilies (or chili powder)
- 1/4 ts. cayenne pepper
- 1/4 ts. cumin
- 1/4 ts. onion powder
- 1 ts. salt
- 1 1/2 ts. garlic powder
- 1 - 28 oz. can crushed tomatoes
- 1 - 28 oz. can petite diced tomatoes
In a large pot over medium heat, brown the ground beef and drain any excess liquid.
Add the onion and allow them to soften for 3 to 4 minutes.
Add the zucchini and carrot and cook for an additional two minutes.
Next add the crushed and diced tomatoes with all their juices.
Heat the mixture through, add the spices and cook over medium-low heat for 20 to 30 minutes.


Perfect Skillet Cornbread
adapted from The Pioneer Woman
- 1 cup Yellow Cornmeal
- ½ cups All-purpose Flour
- 1 teaspoon Salt
- 1 Tablespoon Baking Powder
- 2 tablespoons sugar
- 1 cup fat-free Buttermilk
- ½ cups 1% Milk
- 1 whole Egg
- ½ teaspoons Baking Soda
- ¼ cups Shortening
- 2 Tablespoons Shortening
Preparation Instructions
Preheat oven to 450 degrees.Combine cornmeal, flour, salt, and baking powder in a bowl. Stir together.
Measure the buttermilk and milk in a measuring cup and add the egg. Stir together with a fork. Add the baking soda and stir.
Pour the milk mixture into the dry ingredients. Stir with a fork until combined.
In a small bowl, melt 1/4 shortening. Slowly add melted shortening to the batter, stirring until just combined. In an iron skillet, melt the remaining 2 tablespoons shortening over medium heat. Pour the batter into the hot skillet. Spread to even out the surface. (Batter should sizzle.)
Cook on stovetop for 1 minute, then bake for 20 to 25 minutes or until golden brown.
Edges should be crispy!


Wednesday, October 6, 2010
Warm Roasted Potato Salad
Tweet


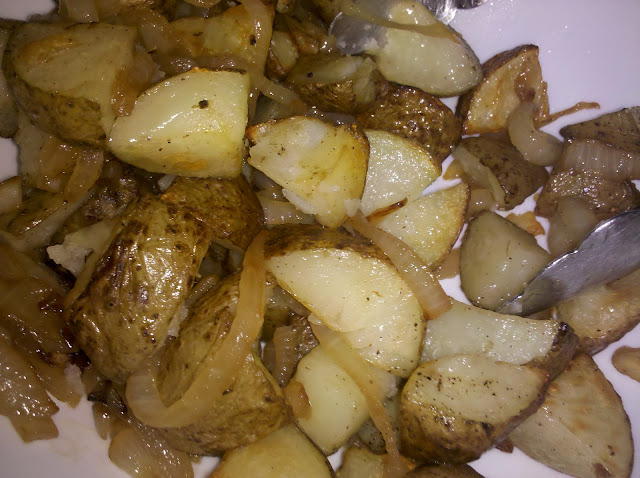
The same old side dishes can get reeeeally boring, so I wanted to switch it up a bit with this warm potato salad. It's really easy, and can be made fairly quickly. It's sort of like a deconstructed baked potato, and maintains all of the delicious-ness of the original inspiration. I ate this with Spicy Oven Fried Chicken and the combination was great, with spicy pepper flavors in the chicken and sweet caramelized onions with crispy roasted potatoes.
Warm Roasted Potato Salad
Prep time: 6 minutes Cook time: 15 minutes
Cost $2.36 Servings :4
1 tb. Smart Balance1 large onion, sliced1 teaspoon minced garlic2-3 pounds of potatoes, cut into large cubesolive oil1/4 teaspoon kosher salt, to taste1/4 teaspoon cracked black pepper, to taste3 strips of turkey bacon, choppedgreen onions (optional)1/4 cup of sour creamnon-stick spray
Hardwaremicrowave safe bowl (glass please!)plastic wrapsheet pan
Preheat the oven to 425 degrees, and heat a saute pan to medium heat. Add the Smart Balance (or butter, or other butter substitute of your choice), the onions and garlic to the pan and allow them to soften. Thoroughly wash the potatoes and cut them into large cubes (around 1 1/2 inches). Put them into the microwave safe bowl and cover the bowl with plastic wrap, poking holes for ventilation before microwaving for 10 minutes on high. Let the bowl cool for a few minutes and remove the plastic wrap (WARNING: Very, very, very hot steam is under there so be careful!). Drain any excess water and toss with a drizzle of olive oil and season with salt and pepper. Pour the potato cubes onto a sheet pan prepared with non-stick spray, and bake at 425 for 15 minutes or until the skins are crispy and the potatoes are brown. When the onions and garlic are caramelized, remove them to the empty bowl, and add the chopped bacon to the pan and brown it. Remove the bacon pieces and drain on a paper towel. When the potatoes are done, toss them with the onions, add the sour cream and season with salt and pepper to taste. Top with the crispy bacon pieces and green onions.


Monday, October 4, 2010
Spicy Oven Fried Chicken
Tweet

Sunday was a very long day for me, I was trying out all kinds of new recipes so that I can tell you all about them. From sunrise ( I LITERALLY stayed up after Fajr on a Sunday morning!) until sunset (yes, until Maghrib) I was in the kitchen doing a few experiments. This one is a tweak on the oven fried chicken I make all the time. The spice in this is excellent because it's not "in YO FAAACE!" kind of hot. It's flavorful, spicy kick kind of hot and even little Elias had no problem gobbling up a leg.
I love this two-part recipe because the brine makes the chicken extra juicy and flavorful, and the panko bread crumbs add a wonderful crunch that makes you not even miss the greasy fried stuff. By adding flavor and texture in each layer of the recipe, the final product is super flavorful. Unlike some oven fried chicken recipes which call for flash frying the chicken before finishing it in the oven, this recipe skips the deep frying altogether making it a much healthier alternative especially if you opt for the chicken breasts. The other great thing about this recipe is that it works for chicken pieces with and without skin! Whatever you like! If you are using a cooling rack for this, make sure that the chicken is suspended above the pan or else the bottom of the chicken will be soggy. Make sure that each piece is completely and evenly coated in each step so that the crust is neither too heavy (it will fall off in clumps, believe me) or if there are large spaces without all three layers the juices from the chicken will spill out and make the whole thing mushy. One last tip: You can put the dredging flour and panko in a shopping bag (paper or plastic? It's up to you!) for easy clean up!
P.S. Sorry there are no step by step photos, I was kind of in a rush!

Sunday was a very long day for me, I was trying out all kinds of new recipes so that I can tell you all about them. From sunrise ( I LITERALLY stayed up after Fajr on a Sunday morning!) until sunset (yes, until Maghrib) I was in the kitchen doing a few experiments. This one is a tweak on the oven fried chicken I make all the time. The spice in this is excellent because it's not "in YO FAAACE!" kind of hot. It's flavorful, spicy kick kind of hot and even little Elias had no problem gobbling up a leg.
Spicy Oven Fried Chicken
1 whole chicken, cut upor4 boneless skinless chicken breasts1 box of panko bread crumbs2 eggs1/2 cup milknon-stick spray
Brine1 tablespoon salt1/4 teaspoon of onion powder1/4 teaspoon garlic powder1 teaspoon poultry seasoning1 teaspoon Italian seasoning1 teaspoon crushed red pepperpinch of cayenne pepper2 teaspoons of Worcestershire (I used extra tenderizing)enough water to cover all chicken pieces
Dredging Flour2 cups of flour1/2 teaspoon salt1/4 teaspoon pepper1/4 teaspoon garlic powder1/4 teaspoon onion powderpinch of cayenne pepper
Preheat the oven to 375 degrees. Prepare your pan with a coat of non-stick spray, either a wire cooling rack on a sheet pan or casserole dish, or use a broiler pan.In a large bowl, place all chicken pieces and add enough water to submerge all pieces. Add the brine ingredients, and cover with plastic wrap. Refrigerate, or, if it's a cool day you can leave it on a countertop for about 1 hour.
Next, prepare a dredging station with three large mixing bowls. In the first bowl mix all of the ingredients for the dredging flour. In the second bowl, mix the eggs and milk until combined. Pour the entire box of panko in the third bowl.
Once the chicken has brined, remove it from the liquid and shake off any excess water before dropping each piece, two at a time, into the dredging flour. Coat each piece, then dip it in the egg mixture, and finally in the panko shaking off any excess coating and placing them on the prepared pan as you go. After all the pieces are coated and placed on the pan, spray each piece with the non-stick spray. Bake at 375 for 35-45 minutes, or until the chicken is golden brown and firm to the touch and at an internal temperature of 165 degrees.
I love this two-part recipe because the brine makes the chicken extra juicy and flavorful, and the panko bread crumbs add a wonderful crunch that makes you not even miss the greasy fried stuff. By adding flavor and texture in each layer of the recipe, the final product is super flavorful. Unlike some oven fried chicken recipes which call for flash frying the chicken before finishing it in the oven, this recipe skips the deep frying altogether making it a much healthier alternative especially if you opt for the chicken breasts. The other great thing about this recipe is that it works for chicken pieces with and without skin! Whatever you like! If you are using a cooling rack for this, make sure that the chicken is suspended above the pan or else the bottom of the chicken will be soggy. Make sure that each piece is completely and evenly coated in each step so that the crust is neither too heavy (it will fall off in clumps, believe me) or if there are large spaces without all three layers the juices from the chicken will spill out and make the whole thing mushy. One last tip: You can put the dredging flour and panko in a shopping bag (paper or plastic? It's up to you!) for easy clean up!
P.S. Sorry there are no step by step photos, I was kind of in a rush!
Saturday, October 2, 2010
Panini Without A Press
Tweet
 I heated my cast iron pan over medium-low heat and stacked my sandwich. Then I drizzled olive oil, and added my sandwich then put a stock pot on it with two bags of rice in it for weight (hey, I was improvising!). After the first side browned, I drizzled more oil and flipped the sandwich placing my "rice weight" back on top. Then I gave myself a pat on the back for coming with with a pretty tasty panini on command.
 Panini
If you're following me on Twitter, then you are well aware that today is a "Reconstruction Day", i.e. we are restoring order to our home after ravaging it in a matter of a few days. So we've been working hard since 6 am. Fast forward to 12:30, and I ask Shaheid what he would like for lunch. I know that you will think I'm kidding when I tell you what his response was, but I'm very much telling the truth. Now you can have an idea of what my life is like. His reply was as follows:
"Do we have a panini press?"
And yes, he was serious. So into the kitchen I went, and this is what transpired.
Ingredients (in this order)
Bread- Garlic Parmesan Italian Loaf with Grey Poupon deli mustard
Cheese- Italian blend (provolone, mozzarella, parmesan, fontina, asiago)
Meat- beef salami
Veggies- tomato slices, spinach leaves, bread & butter pickles
Cheese- sharp cheddar
 I heated my cast iron pan over medium-low heat and stacked my sandwich. Then I drizzled olive oil, and added my sandwich then put a stock pot on it with two bags of rice in it for weight (hey, I was improvising!). After the first side browned, I drizzled more oil and flipped the sandwich placing my "rice weight" back on top. Then I gave myself a pat on the back for coming with with a pretty tasty panini on command.
  |
| Burnt panini ( I realize that it's REALLY burnt). |
Now, that is how I would have done it had I not burned the first side of the sandwich. Once that happened, I very gently cut off the burnt bottom and started over (I told you I was improvising!). But all's well that ends in a panini, right?
The great thing about this sandwich is that it would be really great without the meat, which is perfect for next week since I'll be going meatless starting on Monday (stay tuned for that adventure) or with any of your favorite combinations of meats, cheeses and veggies. The bread is what really made this panini great. It was flavored with garlic and parmesan, and it was just the right thickness to be pressed so that it was not too flat when the sandwich was cooked but not doughy either. For $1.50 at Wal-Mart, it will DEFINITELY do.
What I'm Eating

I'm up at 6 am on a Saturday folks, aren't I a busy bee? This is all thanks to my wonderful husband who reminded me that hard work doesn't sleep,even on crisp fall mornings when the temperature is just right when you are under the sheet but only halfway under the comforter. So I got up after morning prayer, Fajr, and picked up where I left off last night on my research on organic and natural foods in restaurants. (For those of you who don't know, I'm a senior at East Carolina University in the Hospitality Management program.) I hard boiled two eggs, sprinkled them with cracked black pepper and about 17 grains of kosher salt and added some whole wheat toast with Smart Balance and half a banana. That was until someone who's name rhymes with Rasheed gave me that "I should have taken her up on that boiled egg offer" look and I ended up forfeiting half of my egg and banana. Two cups of coffee later and here I am, distracting myself from my research with my blog. But there's a full day of house cleaning, laundry and baking ahead so I'll come back later with how that all goes.
Wednesday, September 29, 2010
Better Bitter Greens

I am not a fan of bitter lettuces. At all. But I've been trying my best to eat them because they're really good for you. After almost a week of traveling here and there for family things I landed back home, weary from the hectic days of travel. So I found some suitable leftovers, and made a plate of said greens. Then I added some sliced red onions, carrots and the magic ingredient that changed my view of these dark and bitter greens forever : parmesan cheese! Just a sliiiight sprinkle was enough to cut the bitterness in the greens, and my bitterness towards them. So much that I could (and did) eat two plates full on any given day.
Do any of you have the same problem adjusting to new, healthier foods? What are some foods that are acquired tastes for you, and how did you learn to love them?

What I'm Eating

Breakfast is Kashi Cinnamon Harvest, 1% millk, and coffee. Since I've been out of town there is no fruit around. What are you having to start your day today?
Friday, September 24, 2010
"Surprise! Company's Coming" Baked Spaghetti and Zucchini
 Baked spaghetti
This afternoon my husband called me and told me he invited his parents and some family to dinner.....a few hours later. Then he told me he wanted spaghetti. Spaghetti? Okay, simple enough. So I packed up the kiddies, drove to the store, spent 40 minutes shopping for what should have taken 15 and began cooking in a frenzy. A frenzy is usually about the worst way to do something, especially cook but what choice did I have?
I filld a big pot with a bunch of water, and added 1 1/2 pounds whole wheat spaghett, no salt because I was cooking for a no-sodium crowd. So I grabbed my Ninja (remind me to rave to you all about this wonderful little machine later) and buzzed 1 onion, 1/2 of a green and 1/2 of a red bell pepper, and 3 cloves of garlic. I added it to a hot pan with about 2 teaspoons of oil, sunflower oil to be exact. Then I added
- 1/2 lb. of 93/7 ground turkey
- 1/2 pound 96/4 ground beef
- 1/2 pound 93/7 ground beef.
- 1 can of diced tomatoes with basil,oregano and garlic,
- 1 can crushed tomatoes with garlic and olive oil
- 1 can crushed tomatoes with basil
Somewhere in this frenzy, I sliced two zucchini and 1/2 an onion and added them to a piping hot pan with 1 tb of Smart Balance and let it get all brown and tasty, then I added black pepper and garlic powder. Then for 20 minutes the cheese melted and browned, and then we all ate baked spaghetti and zucchini with smiles on our faces :)
P.S. What is your go-to meal when you have last minute company?
*I apologize for the lack of pictures, I told you I was in a frenzy right? And oh yea, did I mention this meal had NO added salt, and a negligible amount of added fat? With whole grain? Yea, pick up your brain off the edge of the lamp shade, because you mind has officially been blown.
UPDATE 3:13 AM
 Broken glass
This is the broken glass from the bowl that fell out of a cabinet and bounced off my chest before crashing to the floor at 3 am. Great! I needed this with two kiddies running around! Who else would this happen to besides me? Maybe you? What's your clumsy cook story?
Wednesday, September 22, 2010
What I'm Eating

Chips ---> Ruffles Fat Free (made with Olestra!)
Carrots---> Organic baby carrots with 1 tablespoon ranch dip. Make some! Use 1 container of low fat or fat free sour cream and mix in a packet of Hidden Valley Ranch mix. Great snack, low on calories.
Muffin Makeover
 |
| Yes, my muffins are on a paper plate. Don't judge me. |
Remember the other day when I posted a very tasty (what, you didn't try it yet?) blueberry muffin recipe? Well i fulfilled my promise and did a remix with dried cranberries, and trail mix. Sounds exciting right? Here's the recipe.
Orange Cranberry Muffins
2 cups all purpose flour
2 ts. baking powder
1/4 ts. salt
1/2 cup Smart Balance Spread - Original
2/3 cup sugar
2 eggs
1/2 ts. orange zest
1/4 c. orange juice
1/4 c. milk ( I used 1%)
1- 1/4 cup dried cranberries or trail mix*
Preheat the oven to 375, and prepare your muffin pan by lightly coating it with Smart Balance. Mix flour, baking powder, and salt together in a small bowl and set aside.
Fold carefully, please! With a hand mixer, or in the bowl of a stand mixer cream the Smart Balance and sugar until it's fluffy, around two minutes. Add the eggs one at a time, making sure the first is incorporated before you add the second. If you're using a stand mixer remove the bowl from the stand. Fold in the first third of the flour, then add the milk. Fold in the second third of the flour, then the orange juice followed by the last bit of flour. Make sure that the flour or liquid you're folding in is incorporated before you move on. Add in the orange zest, then the cranberries or trail
Action shot!
mix. Use an ice cream scoop or 1/4 cup measure to dip the batter into the pan. Top with extra cranberries or trail mix if you'd like. Bake 20 minutes, or until the edges and tops are golden and puffed.


 |
| Trail mix with crack like addiction properteis. |
Before I proceed I will say this: If you THINK you don't like dried cranberries, you do. That's it, it's that simple. If you can eat a raisin, you can eat a dried cranberry! If you don't like raisins, eat Great Value Indulgent Trail Mix and you'll start eating raisins. I NEVER ate raisins until I started eating it. Plus, all this stuff is really good for you, so if for no other reason than that, let's give it a try. What do ya say? Yes? Okay!
These muffins were a great success, especially considering the substitutions. Smart Balance has much fewer calories than the butter in the original recipe, as well as the 1% milk. I used Simply Orange juice, but if you use a sweetened orange juice you may want to cut back on the sugar in the recipe. And now for my asterisk regarding the trail mix...I used Sam's Choice brand Indulgent Trail Mix, which has golden raisins, cranberries, chocolate chips, white chocolate chips, peanut butter chips, almonds and cashews. If I were you, I'd remove the whole nuts from the trail mix when adding it to the batter. If you're a fan of huge nuts in your muffins, be my guest. Otherwise I would chop them or leave them out all together.
  |
This recipe is modified from the Food Network recipe found here.
Subscribe to:
Posts (Atom)